
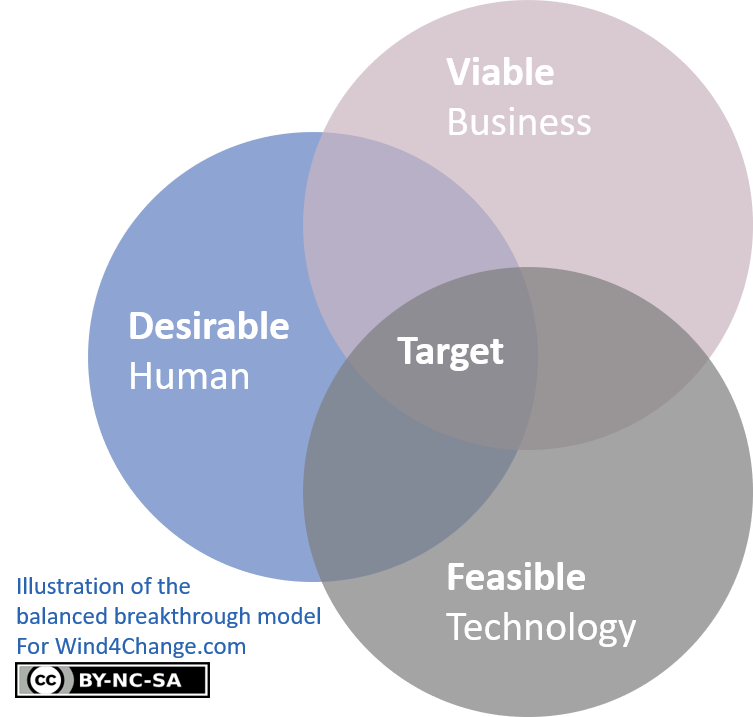
Design Thinking also called Human-Centered Design is a structured exploratory approach putting human being at the center to solve complex problems and/or create innovative products and services. As a matter of fact, it is widely applied in many area and industries from IT and HealthCare to Social Innovation and Education. Clearly, Design Thinking starts with humans and their needs, fears and hopes to design a solution that is at the same time desirable, technically feasible, and economically viable.
- What are the main phases and steps of Design Thinking double diamond
- What are the principles of Design Thinking ?
- Design Thinking prepare step
- Design Thinking step 1: Empathize
- Design Thinking step 2: Define
- Design Thinking step 3: Ideate
- Design Thinking step 4: Prototype
- Design Thinking step 5: Test
- Design Thinking post step: Launch
- What’s next? Learn about other frameworks around Product Development like Lean Startup, Story Mapping, Impact Mapping and Agile
- Do you want to learn more about Design Thinking? Here are some valuable references
What are the main phases and steps of Design Thinking double diamond
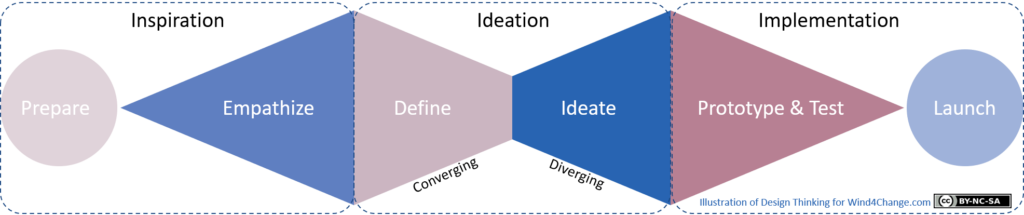
If we combine the representation from Stanford d school and Ideo, we have the following 3 phases and 7 steps for the Design Thinking double diamond:
- Inspiration
- Prepare: capture a first draft description of the problem you want to solve with the timeframe and means to do so.
- Empathize: learn about the customers you are designing for.
- Ideation
- Define: refine your learning to describe the problem you want to solve and express it as design principles.
- Ideate: generate ideas then select them to draft a solution or a range of solutions.
- Implementation
- Prototype: build an experiment to test your solution.
- Test: confirm or deny your potential solution with the prototype.
- Launch: conduct a real life prototype then a pilot as last confirmation before go-live.

Note that Design Thinking is a non linear process and is highly iterative. So this sequential representation is for simplification only.
What are the principles of Design Thinking ?
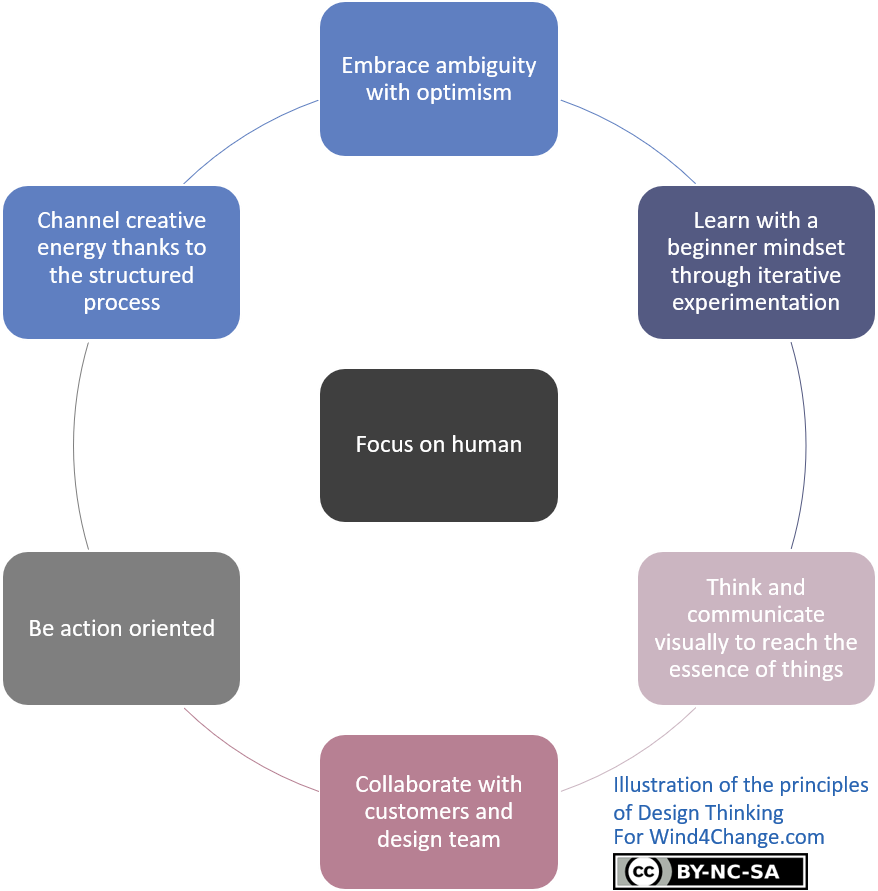
Focus on human
Design Thinking definitively puts humans at the center. Indeed, everything starts with an intensive study about the customers in all aspects, rational and emotional, to fully understand them. It is not just about expressed needs as it goes further to get in the shoes of the customers.
Creative confidence is the notion that you have big ideas, an that you have the ability to act on them.
Creative confidence consists in the 2 following principles: embrace ambiguity with optimism and learn with a beginner mindset through iterative experimentation.
Embrace ambiguity with optimism
In Design Thinking, there is this optimistic conviction that even if we don’t know the answer, it’s out there and we can find it. So how numerous are the obstacles, designers focus on the possibilities not the problems. They truly believe that they can solve all problems.
Actually, not knowing the answer is the prerequisite to free us to open imagination and disruptive innovation. In other words, it pushes us outside routine improvement and to think about options that we would not have consider from start.
Learn with a beginner mindset through iterative experimentation
I have not failed. I’ve just found 10,000 ways that won’t work.
Learn from Failure. Don’t think of it as failure, think of it as designing experiments through which you’re going to learn.
Design Thinking is about learning from customers you are designing for about their minds, emotions and environment. One of the key tool is experimentation and this comes with prototypes. They can be very basic as each prototype is designed to test cheaply an hypothesis or clarify a learning area. Surely, knowledge grows as designers quickly and iteratively try new experiments.
Think and communicate visually to reach the essence of things
Design Thinking fully leverages the power of visual display. It is true about communication either to customers or collecting information from customers. But also to clarify information collected, to design the solution and to collaborate within the design team.
Collaborate with customers and design team
Collaboration with customers and in the design team makes it possible to leverage collective intelligence and expand possibilities. Indeed, individual intelligences do not just add, they multiply.
Be action oriented
Design Thinking is definitively action oriented. To illustrate, all thinking is organized to end out to actions either the design of the solution or more learning to be able to design.
Channel creative energy thanks to the structured process
Design Thinking embraces unknown and open possibilities. But it is a quite structured process that channels creativity so it remains focused on the customers’ needs and on delivering actual outcomes.
Design Thinking prepare step
This step is about writing a first draft description about the problem or the challenge to solve. You want to get a formulation that:
- Drives toward an impact.
- Is wide enough to allow a variety of solutions.
- Takes into account the context.
Here are some questions that help to structure your first problem or challenge statement:
- What is the problem that you attempt to resolve? In addition, frame it as a design question.
- Then, what is the impact that you seek to have?
- What are potential solutions to your problem?
- Finally, capture key elements of the context and the constraints that you have to deal with. For instance: geographic, technological, time-based.
In addition, to start your Design Thinking initiative, you need to set up a team, define a roadmap, a backlog of actions and identify all necessary means:
- The team should mix at the same time the skills either functional or technical to cover the scope and the profiles with thinkers, makers, and doers.
- Think about means like budget, space, contributors, trips and all what you may need for this initiative. Consider the time frame of main activities.
Design Thinking step 1: Empathize
Activity
Empathy is the base of a human-centered design process. The main activities are:
- Collecting: collect available information about your customers and the offer, the market, your future product targets.
- Identifying: identify your audience for interaction activities. You need to talk to the right people!
- Observing: observe customers’ behaviors in their day to day environment.
- Engaging: interact with and interview customers through planned or unplanned encounters.
- Immersing: experience what your customer experiences to better understand the situation your customer are in.
Human-centered designers go beyond collecting needs from interviews. They want to know truly their customers and get in their shoes. Indeed, watching what people do, say and how they interact with their environment gives clues about what they think and feel. As a result, this enables to capture tangible and interpret intangible elements of their experience. But collecting this insight is difficult as we look trough filters that remove or distort information. In addition, people you observe may not even be aware about their thoughts, values and emotions. Surely, this is the reason for the principle about the beginner mindset. To put it differently, learn to see things “with a fresh set of eyes”.
So the purpose of empathize step is to:
- Discover needs that customers may or may not be aware of.
- Identify the emotions that guide behaviors.
- Refine your target customers.
All this information will drive the innovation effort.
Design Thinking tools to observe
Camera study
The principle of the camera study is to understand your customers’ experience by seeing it through their eyes thanks to the photo they will take with the camera. Once you have identified the experience you want to focus on, provide a camera to your customer panel and ask them to take a picture of important moments regarding this experience. For example, it can be about their daily morning routine or what significant happens in their kitchen. At last, your customers go through their pictures and explain why they captured them. In addition, you may want to complete with an interview to understand the deeper meaning of the visuals and the experience they present.
What? | How? | Why?
This approach makes it possible to analyze pictures from the field. The design team reviews each element of a given picture over 3 dimensions:
- firstly, “what”, the concrete observation: what is the person you’re observing, doing in the picture? Stick to the facts and capture the details.
- secondly, “how”, the understanding: how is the person you’re observing doing what they are doing? Does it require effort? Is it painful? Do they seem to have a positive or negative experience? Be descriptive with adjectives.
- thirdly, “why”, interpret: why is the person you’re observing doing what they’re doing and why this way? In this step, you make informed guesses regarding motivations and emotions. Try to make meaning into the situation. This step will reveal assumptions to test with your customers.
Design Thinking tools to engage
Preparing the interviews
As time with customers is precious, you need to make the most of it by preparing the interview. There is still room for spontaneous and cheerful exchanges but it must be prepared.
The way to generate the questions with the design team is:
- Brainstorm to produce all potential questions.
- Identify themes and group questions with them.
- Order the questions to support the flow of the conversation.
- Check for consistency and if there is any overlap or gap. In other words, make sure that your questions make it possible to discover hidden insight and verify assumptions.
Interviews
There’s no better way to understand a person’s thoughts, emotions, and motivations than by talking with them directly. As a result, you will collect information on how to innovate for him or her. Indeed, by understanding the choices that a person makes and the behaviors that a person engages in, you can discover their needs, and design to meet those needs.
Here are some good practices about interview in Design Thinking:
- Ask why even if you think you know the reason. You may be surprised, and while going from a question to an answer, you learn more.
- Be specific about your questions not to fall in general case and to make sure to stick to the facts. Ask for a specific occurrence like, the last time that they made a specific action.
- Encourage for stories as while people tell them, they reveal how they think about the world.
- Look for inconsistencies as they may highlight interesting insights.
- Pay attention to nonverbal communication with body language and emotions.
- Accept silence to allow the person to reflect on what they’ve just said. Indeed, the person may reveal something deeper.
- Don’t suggest answers to your questions when the person pauses as this may bias the answer.
- Ask open questions to get more freedom in answer.
- Make sure that you are prepared to capture information with an interview pair taking notes or with a recorder as it is hard to do both interview and note taking. At last, write down exactly what the person says, not what you think they might mean.
Interviews can be of different format:
- Individual interview:
- Conduct your interviews in the person’s place if you can as this will help you learn a lot about his or her mindset, behavior, and lifestyle.
- No more than three team members should attend an individual interview not to overwhelm the person. In addition, each team member should have a clear role like interviewer, note-taker and photographer.
- Group interview:
- Conduct the interview in a neutral place.
- You can quickly understand a community’s life, dynamics, and needs by conducting a group interview.
- All voices should be heard to get diverse opinions. This may require preparing a strategy to engage the quieter members of the group. For instance, you may ask them questions directly or find ways to make the more vocal members of the group withdraw for a moment. At last, you may have to adapt the composition of the groups in some communities.
- Group interviews are also an opportunity to identify those who you might want to go deeper with, for example for co-creation or to test prototypes.
- Expert interview:
- Experts can quickly give you key insights into the context and update you on a topic.
Card sort
By putting a deck of cards, each with a word or single image, in someone’s hands and then by asking them to rank them in order of preference, you can get a great insight into their values and priorities. The deck of cards can also be an opportunity to deepen the conversation about what a person values and why.
Drawing
Trigger deeper and different kinds of conversations with drawing. Whether it’s you with the pen or them, a quick sketch, a graph, or a timeline is a great way to help the person to organize his or her thoughts visually and spark ideas and conversation in a different way than just talking.
Collage
You can understand better the values and the process of thought, by asking the people you are designing for, to build, then to explain a collage. When they are done, ask them to describe the collage with what the various elements stand for. At last, the collage board can support further discussions.
Extreme users
Talking to people at the extreme end use of your product or service can steer your creativity by exposing you to radical use cases and design opportunities that you would not have imagined.
Design Thinking tools to immerse
A day in life
Immersing yourself in the lives and the communities of the people you are designing for, is the best approach to understand their context, values and way of thinking. Spend a day shadowing, observing them and have them, explain you how they make decisions.
Guided Tour
Have them give you a guided tour through their home or workplace as this can reveal their habits and values.
Peers Observing Peers
By seeing how your customers explain their own lives you may learn a lot about the people you design for.
Design Thinking step 2: Define
Activity
The define step is when you download and synthesize your findings from the empathize step. So you can refine the scope of the problem or challenge, and highlight compelling insights and needs. This step addresses 2 purposes:
- Develop a deep understanding of your customer and the design space.
- Build an actionable problem statement: your point of view (POV).
A point of view is a guiding statement that focuses on specific customers, and related insights and needs, discovered during the empathize step. In fact, it is more than a problem statement. Indeed, it is a a design vision that will drive the next steps of the process.
Here is a check list to build a good point of view (POV):
- Frames the problem or challenge.
- Channels focus and innovation effort.
- Inspires both the design team and the customers on mind and heart dimensions.
- Provides a reference for evaluating competing ideas.
- Drives brainstorms by triggering “how might we” statements.
Design Thinking tools to make sense from Empathize input
Story share-and-capture
During the share-and-capture, all members of the design team share the stories that they saw or heard during the empathize step and that were significant to them. Surely, it is important to be both specific (talking about what actually happened) and descriptive (using physical senses to provide depth). For example, a good way to be specific is to use the structure: who, what, when, where, how and give a guess on why.
This addresses 3 purposes:
- Put in common all observed details to enrich the observations and reach a common understanding on the facts.
- Enrich the meaning based on the converged facts.
- Initiate the synthesis process with what Design Thinking calls saturation.
Visualize with saturate and group
The purpose of this tool is to collect all thoughts and experiences from the empathize step into tangible and visual pieces of information. To put it differently, all findings and ideas are captured as post-its and pictures over a wall or a big board. Truly, this visual management will inform and inspire the design team. Once information downloaded, the design team takes a bird’s-eye view of the system and explore for themes and patterns to emerge. Furthermore, the design team identifies how different ideas relate to one another using relation maps. As a result, this will enable the design team to discover meaningful needs of customers and insights that will shape the design of solutions.
In addition, to make sense of information and have different points of view to complete the wall of data, the design team can use the following tools:
- Top Five: to balance with the deep thinking, the design team identifies the top five ideas or themes surfacing.
- Venn diagram: a Venn diagram is a diagram style that shows the logical relation between sets of elements. It is a sort of grouping that can complement theme gathering and identified relationships between ideas.
- 2×2 matrix: a 2×2 matrix gives you a way to lay out ideas over two axes, one vertical and one horizontal. By sorting information in this way, the design team may find out new patterns and broader inferences.
Empathy Map
An Empathy Map is a tool that consolidates observations and highlights unexpected learning. To illustrate, it is structured over 4 questions displayed in a 4-quadrant layout to leverage the power of visual:
SAY: What are some quotes and defining words your user said?
DO: What actions and behaviors did you notice?
THINK: What might your user be thinking? What does this tell you about his or her beliefs?
FEEL: What emotions might your subject be feeling?
Note that thoughts / beliefs and feelings / emotions cannot be observed directly. So, they must be inferred by paying attention to various clues like body language, tone of voice, and choice of words.
On side of the empathy map, the design team captures 2 deductions:
- Customer needs: needs are either physical or emotional. They are critical to the design as meeting the needs is its purpose. Typically, needs are expressed as verbs and related elements of solution as nouns. Needs can come from findings or inconsistency between findings like a gap between what customers say and what they actually do.
- Additional insights: an “Insight” is a significant finding that you leverage to better meet a design challenge. The design team may identify insights from contradictions between two customers’ attributes or from unexplained behaviors.
Customer journey map
A customer journey map is a visual representation of multiple observations and interviews as a journey or a process. To illustrate, it can be the customer’s day, experience, or a map of how a product moves through space and time. All journeys or processes relevant to your problem or challenge can be covered this way to generate insight. Also, a journey map is a good way to visualize the steps and milestones of a process. At last, it can be used to share internally in the design team or with customers and contributors.
To build a journey or process map, organize the data in a way that makes sense: a timeline of events, a series of pictures or a number of parallel timelines that allows comparison. Then, try to see the big picture to identify the patterns or anomalies that can lead to insights or questions.
Persona / composite character profile
The persona or composite character profile is a synthesis method whereby the team creates a (semi)-fictional character who embodies the observations the team has made in the field as “typical” characteristics. Surely, it is a way for the design team to focus on the significant and relevant characteristics of the customer they design for. The persona is then a reference when designing the solution.
In order to create a composite character profile, a design team uses the saturate wall or board of its field observations. Firstly, the team focuses on customers encountered in the field to identify dimensions with commonality, difference and/or complementarity. These dimensions can be demographic, behaviors, source of motivation. Secondly, the design team looks for patterns to identify group of customers. At last, the team gives a name to the persona and confirms that the character is consistent to all members.
Design Thinking tools to prepare the frame for ideation
Point-of-view madlib
A point-of-view (POV) is the reframing by the design team of a design challenge into an actionable problem statement. A POV Madlib is the formatting that shapes a POV:
[USER] needs to [USER’S NEED] because [SURPRISING INSIGHT]
You’re not looking for a solution here, but you are transforming a theme into a core insight of your research, an element of design vision. As a guideline, 3 to 5 points-of-view is a good number. As a result, this format will enable the design team to the generative ideation by creating How-Might-We (HMW) questions based on its POV.
The design team will generate POV by scanning the refined insight from the data wall.
Keep in mind that that the insight is not just the reason for the customer’s need. Actually, it is more a consolidated statement that you can relay on when designing a solution.
An example of point-of-view (POV):
– User: An adult person who lives in a city
– Need: To use a car for 10-60 minute trips 1-4 times per week
– Insight: The user would not want to own his own car as it would be too expensive compared to his needs. He would like to share a car with others who have similar needs, however, there are no easy and affordable solutions for him. It’s important for the user to think and live green and to not own more than he truly needs.
Point of View can be expressed with alternative approaches
- POV Analogy:
- Metaphors can encapsulate insights in an impactful picture with rich meaning. A POV Analogy uses the power of metaphor to express the design challenge in a concise and compelling way.
- The design team discovers metaphors from the wall of data by looking at analogies between your customers’ situation and other areas.
- An example of design directive expressed as a metaphor is regarding the iPod where the design vision was to create a “personal music player as jewelry”.
- POV Want Ad:
- A POV Want Ad expresses your distilled findings into an intriguing format of a want ad (classified advertisement). It is usually more ludic and subtle than the basic madlib format [USER] [NEED] [INSIGHT] but still it should clarify the problem or challenge.
- The want ad format tends to focus on a specific customer group and their main characteristics.
- A possible format could be: [descriptive characteristics of a customer] seeks [customer’s need] with in addition [additional findings about expectations]
- For instance:
High-energy teenager seeks awesome social network. Interests should include issues of societal importance (e.g. how much parents suck and also why being a vegetarian might be cool). Willingness to Instant Messaging constantly during the school year is a MUST!
Point of View sanity check list
The design team can check how its points of view are meaningful, actionable, unique, narrow and appealing with the following check list:
– What’s the point? – Then what is your team’s angle?
– To continue, what is your team’s framework in stating a POV?
– Is it User-centered, Need-based, and Insight-driven?
– Who says? – How valid is your team’s POV?
– Is your position supported by findings from users?
– Then, is it a distillation of findings? Is this applicable outside of one colorful interview?
– What’s new? – What is the value-add of your POV?
– Have you articulated your findings in a new way?
– Are they placed in the context of a user?
– If your POV doesn’t feel new, try being more specific.
– Who cares? – How is your POV significant?
– Your team should be excited at this point!
– Is this work worth doing? If not, ask yourself why?
– Reframe/rephrase until you get it right.
Design principles
Design principles are guidelines to solve a design challenge and they are independent of a specific solution. The team generates design principles translating its findings like needs and insights into design directives. These principles capture abstracted but actionable guidelines for solutions that highlight the design intentions.
For instance a customer’s need “to feel instrumental in creating a gift” would become the design principle “involve the user in creating the final gift outcome.”
“How Might We” questions
“How might we” (HMW) questions are short questions that initiate the ideation brainstorms. The design team generates “How might we” (HMW) questions from point-of-view statements, design principles, or directly from insights. Surely, HMW questions should find the right balance to be broad enough to allow a wide range of solutions and at the same time to be narrow enough so the team is constrained and generates innovative ideas.
To illustrate:
– Too narrow “HMW create a cone to eat ice cream without dripping”
– Too broad “HMW redesign dessert”
– Balanced “HMW redesign ice cream to be more portable.”
Some examples of translation of insights into HMW questions:
First example:
– Insight: “Without proper maintenance, toilets will become dirty very quickly.”
– HMW: “How might we design toilets to be easily serviced and maintained?”
Second example:
– Insight: “The people who live and work near a public toilet play a crucial role in directing users toward or away from it.”
– HMW: “How might we create an experience that will drive the surrounding community to encourage more use?”
Design Thinking step 3: Ideate
Activity
Ideation is the step that starts from the defined problem or challenge and explore solutions to customers. Clearly, the approach comes in 2 distinct times:
- The first time is divergence to produce both quantity and diversity of ideas to generate radical design alternatives.
- Then only, comes the second time, convergence, with the selection and consolidation of ideas into design concepts and principles.
The principles of the ideation step are:
- Generate both quantity and variety of ideas to widen solution options.
- Put aside obvious solutions to explore beyond and increase the innovation potential of your solution set.
- Uncover unexpected areas of exploration.
- Fully leverage the diversity of points of view of your design team to multiply ideas.
- Get inspiration from disrupters who are players from unrelated sectors who bring different perspectives.
- Learn from related worlds and how other sectors and organizations deal with similar problems or challenges.
Brainstorming
Brainstorming is a great way to produce a lot of ideas. To illustrate, the approach of brainstorming is to leverage the collective thinking of the group with all members listening and building on other ideas. In addition, the group dedicates a short time period of 15 to 30 minutes to foster high energy and engagement in producing ideas. In other words, the group turns up the generative part of their brain and turns down the evaluative part. Then, ideas are typically captured as post-its in a large board or a wall.
The starting point of the brainstorming is a question from the “How Might We” questions generated in the define phase. Surely, it is essential to launch the workshop but also to channel the creative energy.
Then comes the selection of ideas, the harvesting. So, the strategy is to converge with the design team consolidating and combining ideas. But not too fast, so you preserve the variety of solutions and don’t settle too fast on the safe choices. In addition, don’t immediately filter on feasibility as not plausible ideas may still have an aspect that is useful and meaningful.
Get visual during the divergent and convergent times. Clearly, it makes ideas more tangible and helps clarify thoughts. At last, it can unlock innovative ideas.
The design team may select ideas by:
- Dot voting on post-its for instance with 3 votes per person.
- Categorizing ideas for example with:
- The rational choice, the most likely to delight, the darling, and the long shot.
- The types of prototypes possible from the ideas: a physical prototype, a digital prototype, or an experience prototype.
The brainstorm structures over 7 rules
– Defer judgement. You never know where a good idea is going to come from. The key is to make everyone feel like they can say the idea on their mind and allow others to build on it.
– Encourage wild ideas. Wild ideas can often give rise to creative leaps. When devising ideas that are wacky or out there, we tend to imagine what we want without the constraints of technology or materials.
– Build on the ideas of others. Being positive and building on the ideas of others take some skill. In conversation, we try to use “ yes, and…” instead of “but.”
– Stay focused on the topic. Try to keep the discussion on target, otherwise you may diverge beyond the scope of what you’re trying to design for.
– One conversation at a time. Your team is far more likely to build on an idea and make a creative leap if everyone is paying full attention.
– Be visual. In Brainstorms we put our ideas on Post-its and then put them on a wall. Nothing gets an idea across faster than a sketch.
– Go for quantity. Aim for as many new ideas as possible. In a good session, up to 100 ideas are generated in 60 minutes. Crank the ideas out quickly and build on the best ones.
The facilitation of the brainstorming organizes over 3 pillars
- Space: the facilitator prepares the space with a landing area for post-its either a board or a wall, markers and a enough post-its of all colors.
- Energy:
- The “How Might We” questions trigger the workshop.
- Then, the facilitator makes sure that the ideas keep flowing, for instance by adapting the “How Might We” questions to drive the group thinking in another direction.
- Furthermore, the facilitator may use a few provocative ideas to re-energize the team.
- Constraints:
- Process constraints, like time and output, for instance 50 ideas in 20 minutes.
- Idea constraints, like “How would superman do it?”, “How would your spouse design it?,” “How would you design it with the technology of a century ago?”
Design Principles
As the design team consolidates the ideas about solutions, they will notice that some patterns emerge regarding the design. In other words, design principles are the guardrails of your solution. They are quick and easy to remember guidelines. At last, these principles capture the most significant elements of your solution, shape the design and support consistency over the design iterations.
Based on the wall of data, the design team reviews the most important Post-its to identify themes and extract the core underlying principles. Then, they formulate these principles as positive statements that drive what to design and how to do so. At last, the design team assesses the design principles to make sure they cover the key aspects of your solution.
Mash-Up
A Mash-up matches strange or unexpected ideas together to generate fresh ideas. A typical use is referring to a brand that illustrates well the quality you want to integrate in your solution. For instance, if you want to highlight at the same time the technological aspect and the design of your solution, you may refer it as the “Apple” of the solution you design.
The first step for the design team is to isolate the quality that they want to add to the solution. Is it speed, efficiency, technology or design? Then, they brainstorm on examples of businesses, brands, and services that embody this quality. To continue, the design team picks the top 3-5 examples and tries to come to mash-up questions in the context of the solution to design. At last, they choose for the best mash-up question.
Design Concept
A concept is more refined and complete than an idea. It is an additional step to the solution that starts to look like an answer to your design challenge. Furthermore, you may want to test it with the people you’re designing for.
Design Thinking step 4: Prototype
Activity
Prototyping is making ideas from ideation phase physical. To illustrate, a prototype can take many forms as long as it is physical: a wall of post-its, a storyboard, a set-up space, an object or a role-playing activity. In addition, as the design team progresses in understanding of the customers and that the solution gets more mature, the prototypes become more and more elaborated. But in early exploration, the prototype should remain rough and rapid to enable quick and cheap learning and investigate a lot of different options.
At last, note that prototypes are most successful when the design team, the customers or contributors can interact with them and go through a customer experience. In addition to successfully shape the solution, these interactions make it possible to deepen empathy with customers.
The main benefits of prototypes:
- Exploration: build to think and explore the reality of an idea.
- Testing: test and refine solutions interacting with customers.
- Empathy gaining: deepen your understanding of the design context and your customers’ needs.
- Inspiration: inspire team members, customers and other stakeholders like investors by sharing a common physical vision.
Identify a variable
There may be many aspects of your idea that are candidate for testing, so you need to clarify what you want to learn and which part of your solution you want to test. Clearly, this is the purpose of identifying the variable to test. In addition, you do not need in most cases to build elaborated prototypes to test your assumptions. As a result, you save energy, creating a prototype that will focus only on the variable that you want to test. And you will get a quick feedback too.
Actually, incorporating too many variables can compromise the feedback from customers as they become unsure what they are responding too. So, create simple and one-variable prototypes. But, create many of them to test all your essential variables. At last, keep in mind when building your prototypes that feedback is usually richer when customers have a choice and can make comparisons. Surely, you want to avoid a generic feedback such as “I like it”!
Prototype
Prototyping is an iterative process where the design team generates low-resolution artifacts to test different aspects of your idea or design solution. Furthermore, the core principle of testing with prototype is to let customers experience them and react to them. Truly, this allows you to review your solution and at the same time to deepen your understanding of customers and their needs.
Beside that, when building prototypes, have in mind the context and the testing scenario you will set to get relevant feedback. In other words, you do not just hand out your prototype to a customer and observe what happens! You should try to get closer to the actual context where your solution will be used.
Some tips about prototyping:
- KISS: Keep It Simple and Stupid, to put it differently, build quickly the most basic prototype that will be enough to test your variable. Do not overinvest.
- Build with customers in mind and what you want to test with them: an aspect of the solution, a behavior?
- Think while doing: even if you are unclear about your prototype, start creating something with basic materials (paper, tape markers…) as turning ideas physical may clarify how to build the prototype.
Prototypes can shape in a wide range of formats
- Flowcharts: this format is more for internal use within the design team and consists in the steps and major events of the customer’s experience.
- Storyboards: simple sketches sometimes enhanced with photos or screen shots. To illustrate, the sketch-based storyboard looks like a comic or the storyboard to create the “making of” for a movie. In addition to capturing the customer’s experience, the storyboard makes it possible to refine the details. Indeed, storyboarding pushes the design team to think through how one thing leads to the next and to enforce prerequisites and consistency to reach the desired end result.
- Metaphorical prototypes: for instance a poster with images that plays as a metaphor for the new service.
- Videos: they combine aspects of a storyboard and screen shots into a single format.
- Paper prototypes: prototypes built from paper or other simple materials that enable quick tests, yet relevant, and remove the time and expense of generating real test products.
- Lego prototypes: Lego bricks and Design Thinking are a great mix. Indeed, Lego bricks can combine in infinite ways. You may buy combo boxes, aka classic bricks bundle, to support Design Thinking prototyping as they come with multiple sizes and shapes of bricks.
- Role Playing: a quick and tangible way to test an idea or experience by playing characters and acting the new experience. The emotional experience from the customer’s perspective is especially important. Role playing often generates new ideas based on unexpected reactions and feelings.
Design Thinking step 5: Test
Test is the step when the design team gets feedback on their ideas or their solutions so they can refine them, test their Points-Of-View (POV) and at the same time deepen their knowledge about customers. Clearly, this step is tightly connected with the prototype step as you iteratively design low-resolution artifacts for a given assumption, a variable, and you place them in the relevant context of customer’s life. At last, in addition to the observation of the experience, you can collect additional feedback from your customers with a debrief through interview or focus groups.
Prototype as if you know you’re right, but test as if you know you’re wrong.
Guidelines for testing with customers:
- Show, don’t tell. Make the prototype the more real possible by emulating the expected experience, then complete with empathy to bring the customer into your concept. For example, highlight details on how the concept will work and how the customers will experience it. Use images, drawing and stories to illustrate. At last, make the choices concrete.
- Make visual. Fully leverage the power of visual to interact with customers.
- Create choices to be made with visual multiple options. Then, play consistently and move the artifacts according to the choices made.
- Play with your prototypes, don’t defend them. Truly, you want the customers to validate them. To put it differently, what is at stake is not the prototype but the validation, or not, of the underlying assumption.
- Capture honest feedback. In order to do so, assure your customers that what you want is honest feedback, even negative, as the prototype is just a tool to learn. So, you will avoid the risk of people feeling that they have to praise your prototype to be nice and encourage you.
Prototyping for empathy
Prototypes make it possible to both test the prototype and gain empathy. But the design team may set prototypes primarily to get knowledge about their customers. This is sometimes called “active empathy” because it is not a passive observation from the outside as you create conditions to collect new insights. Empathy prototypes specifically help you gain understanding about the design context and the customer’s mindset.
Empathy prototypes are often better after a preparation work for you to have a first understanding. Then, you want to dig on certain areas or to confirm assumptions.
User-driven prototype
As the name stresses it, this kind of prototype are driven by users although the design team proposes a frame. The approach with user-driven prototype is to gain understanding by watching the customers create something, rather than try something that you have built.
User-driven prototype allows to uncover different assumptions and needs as customers develop aspects of the design rather than just experiencing a prototype. Clearly, the goal is to understand their thinking and perhaps reveal needs and features that you may not have thought about. But it is not to integrate what they have built into your design.
This kind of prototype is usually valuable in early stages when you want to gain empathy and facilitate different type of conversations.
You need to find the right balance so your prototype is structured enough to guide your customers to create, but open enough so you can learn outside of your own biases and assumptions.
Examples of user-driven prototypes could be:
- Have your customers draw about the topic to investigate.
- Make them build a simple object with basic materials or with Lego bricks that are especially useful for Design Thinking in a user-driven prototype.
- Create a compilation based on pictures for instance from magazines.
Design Thinking post step: Launch
This step comes after the steps about Prototype and Test and is the transition before the product or the service reaches the cruise speed. There are 2 phases:
- Live Prototyping:
- Here, you run your solution during a couple of weeks in the real world.
- Like for other prototypes, you want to identify the last aspects of your product or service that you want to test with your live prototype. In addition, you still try to keep investment in time and money as low as possible, but enough to confirm your last assumptions.
- At last, you need to remain open to changes, as even at this stage surprises may rise.
- Pilot:
- It is more a long-term test than the live prototype. Indeed, a live prototype is a quick experimentation on how your solution behaves in the marketplace. On the contrary a pilot is a continuous involvement.
- Live prototypes are in weeks and pilots in months with full exposure to the market. To put differently, the test in a pilot is about all the system not just the product or service.
- There may be some changes too in this phase, but more in the edges of the service or the product.
What’s next? Learn about other frameworks around Product Development like Lean Startup, Story Mapping, Impact Mapping and Agile
- To learn more about other frameworks supporting Product Development like Lean Startup, Story Mapping and Impact Mapping check my other post.
- In addition, you can review my posts introducing Agile and Agile at Scale.
- At last, learn more about innovation with all my posts about Digital and the disruptive technologies.
Do you want to learn more about Design Thinking? Here are some valuable references
Web references:
- The bootcamp bootleg, the playbook from Stanford d school on Design Thinking
- The Human-Centered Design Toolkit, the playbook by Ideo.org
- A good whitepaper on Point of View – Problem Statement from Interaction-Design.org
- A good whitepaper on “How Might We” questions from Interaction-Design.org
Design Thinking books:
- Designing for Growth: A Design Thinking Tool Kit for Managers
- The Design Thinking Playbook: Mindful Digital Transformation of Teams, Products, Services, Businesses and Ecosystems