
Jira is a software from Atlassian. Jira was originally a ticketing system for bug and request management that evolved to cover agile project management either Scrum or Kanban. In this post, we will introduce Jira software with its model, its navigation and its core functionalities. Surely, Jira is well documented but the materials are quite rich and the tool does have a logic of its own. So, this article is complementary and is an introduction to Jira software model, structure and functionalities.
Jira Project software: model and vocabulary
Actually, Jira software is a group of 3 applications:
- Jira Core with Business projects that is common to the 2 other applications and gathers the core functionalities.
- Then, Jira Service Desk for Service Desk projects that is the original scope of Jira. Clearly here, the focus is on Service Level Agreements (SLAs) and the interaction through a web portal to customers.
- At last, Jira Software that is for Software projects. Surely, the concern here is to support Agile and related main frameworks: Scrum and Kanban. There is all to you need to manage Agile and more, as Jira integrates with Software development tools like Github and web-based wiki tools like Confluence.
We will concentrate on Jira software that is the application to manage Agile. In fact, Atlassian Jira software is the leader on the market when it comes to Agile tooling. In addition to provide all you need with Agile, Jira is really open to customization.
Note that we will reference a lot to Agile to describe Jira software functionalities and set up, so if you are new with Agile, please refer to my post on Agile, and the main Agile frameworks: Scrum and Kanban.
Jira Project
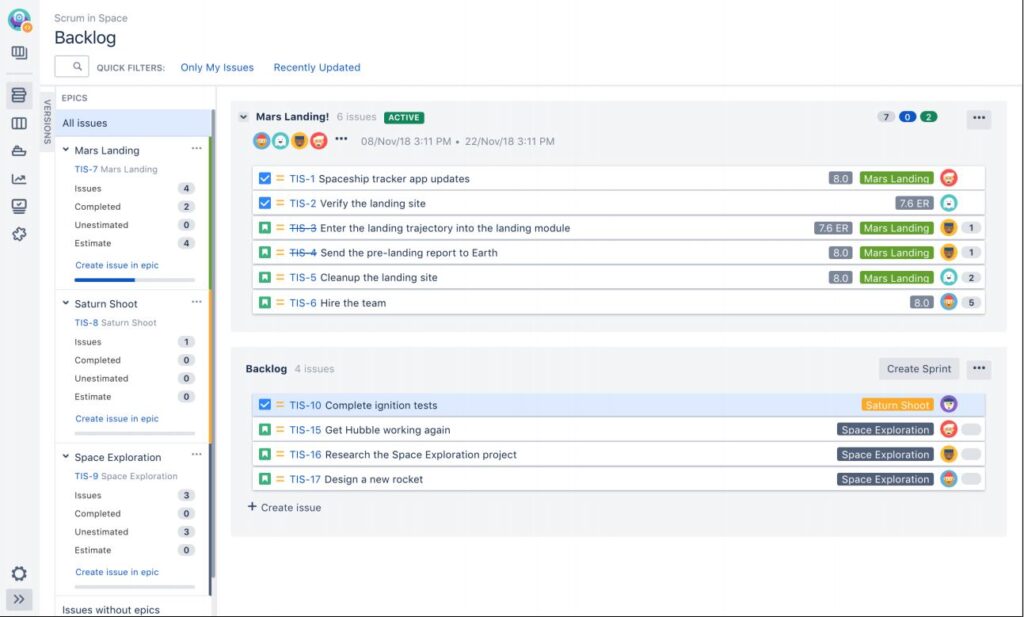
A Jira Project is a collection, a backlog of User Stories and related items like their parents with Epics that may group several User Stories and their children as User Stories may gather several sub-tasks. In addition, their may be other items that may connect or not to User Stories like bugs or requests.
Note that User Stories but also bugs and requests, in other words, all pieces of work for the teams, are called in Jira issues. Really, you can tell here the origin of Jira as Service Desk tool.
Jira Board
A Jira Board is the digital equivalent of a Scrum board or a Kanban board. To illustrate, a Jira Board displays User Stories from one or more backlogs, aka Jira Projects. Furthermore, Jira Boards make it possible to view, create and work on User Stories and related items. In addition, Jira Boards allow the creation and management of sprints for Scrum. They comes with all Scrum and Kanban charts to monitor and communicate on the progress of the team.
Jira boards are of 2 kinds and you have to chose for a given board, one of them:
- Scrum board for teams working in Scrum and that needs to plan and manage their work in sprints.
- Kanban board for teams working in Kanban and therefore managing and constraining their work-in-progress.
Connection between Jira Boards and Jira Projects
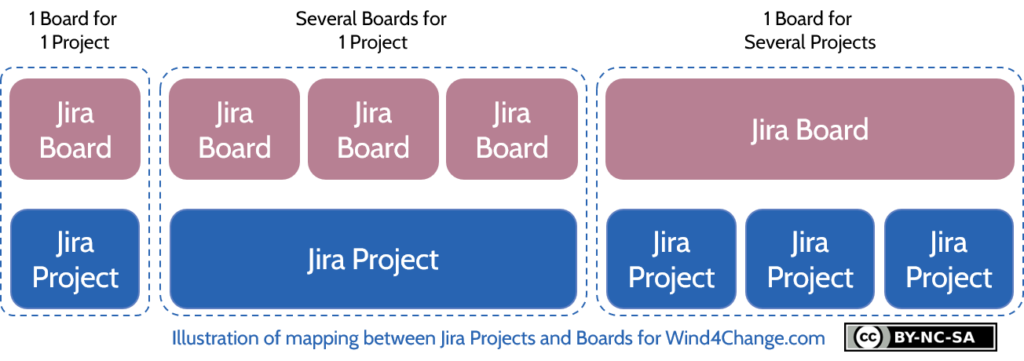
Boards are an additional layer to Jira Projects. Surely, this means that you may have several boards on the same Jira Project. For instance, if you want to work in Scrum with the simple process “To do”, “Work in progress”, “Done”. But you want to create additional boards, for example to manage the refinement of your User Stories or to manage the additional tasks for your release.
Jira software gives the possibility even in Scrum to have a more elaborated process than the default one. So you can customize it to stick with your actual development process as far as you have all your steps connected to either “Todo”, “Work in Progress” and “Done” with your final step closing the User Story. This is done in the parametrization of the Jira Board that we will detail below.
Beside that, you may have the same Jira Board grouping several Jira Projects as a single backlog. For instance, you may have originally created Jira Backlogs for each of your applications, in other words technical assets. Then, as you move to Agile at Scale and reorganize teams as Agile Squads or Feature Teams aligned on features, you may need to have an Agile Squad working on several applications, then as a result, several Jira Projects. In addition, this set up makes it possible to manage dependencies and the need of collaboration between Agile Squads.
Jira Project Search
When it comes to search, you also have a clue about the origin of Jira software as service desk tool, a ticket system where looking for tickets is critical. As a matter of fact, you can perform all forms of search in a Jira Project from the most basic one to the most advanced. Actually, Jira even comes with a query language: JQL for Jira Query Language. The Jira documentation fully describes how to build complex queries with JQL. At last, you can save your queries in what Jira software calls filters. So you can reuse them later or apply them as quick query on you boards. To illustrate, you may want to create queries to filter tickets per team member, so they will be easier to find back during the daily meeting.
Note that boards leverage this capacity of Jira to query and they use filters. Clearly, this is how you can have several boards with different scopes on the same Jira Project and group several Jira Projects in the same Jira Board.
Jira Project navigation
Jira Project navigation has a logic of its own. Really, the first thing to understand is that you have 2 main menus to navigate: one a the top and one one the left.
Jira Project top menu bar
So, let’s review the top bar menu from left to right.

Dashboard
The first choice in the top menu is the about Dashboards that are customizable pages grouping Jira widgets to manage your activity or the activity of your team. In this menu, you can access recent Dashboards and manage Dashboards that you have permission on.
Project
Project is the second choice. Indeed, you may have access to several backlogs, aka Jira Projects, depending on your scope. Similarly, you can access current and recent projects, but also view all Jira Projects that you have permission on.
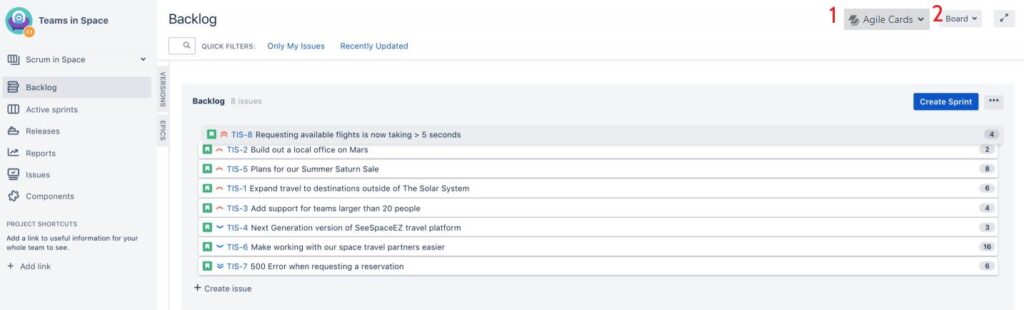
Issues
The third choice in the top menu is about issues, all pieces of work for you and your team: User Stories, Bugs, Requests and more. Here the focus is to search about issues. To illustrate, the options are:
- The current search that is active.
- Search for issues and type a new search.
- Recent searches.
- Filters, aka saved searches.
- And at last, the possibility to manage filters.
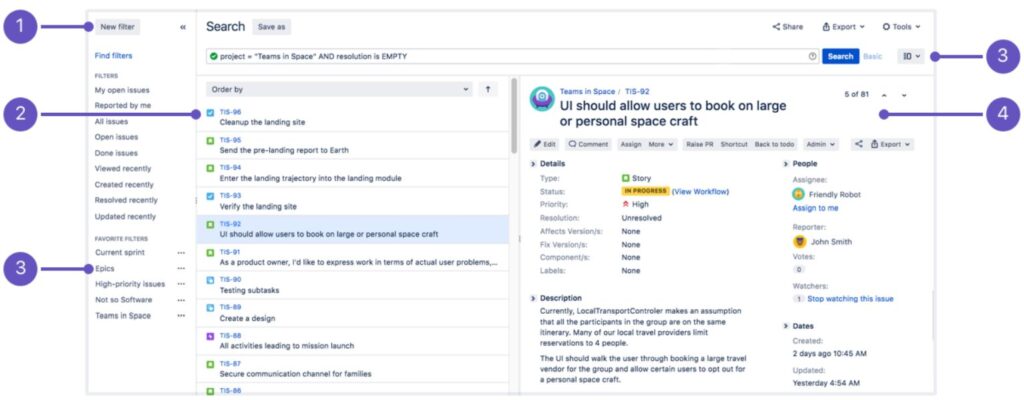
Some of the options on this screen:
- (1) To create new researches, aka filters.
- (2) The list of issues for current filter.
- (3 on left) To filter by Epic.
- (3 on right) To switch between the detail view and list view.
- (4) The details about the selected issue.
Boards
The fourth choice is to go directly to a board. Indeed, when you select a Project in the first choice of the top menu, Jira will send you to the default board of this project. Furthermore, the options are here: recent boards and view all boards where you have permission.
Create issues
This button enables you to jump directly to the screen to create issues.
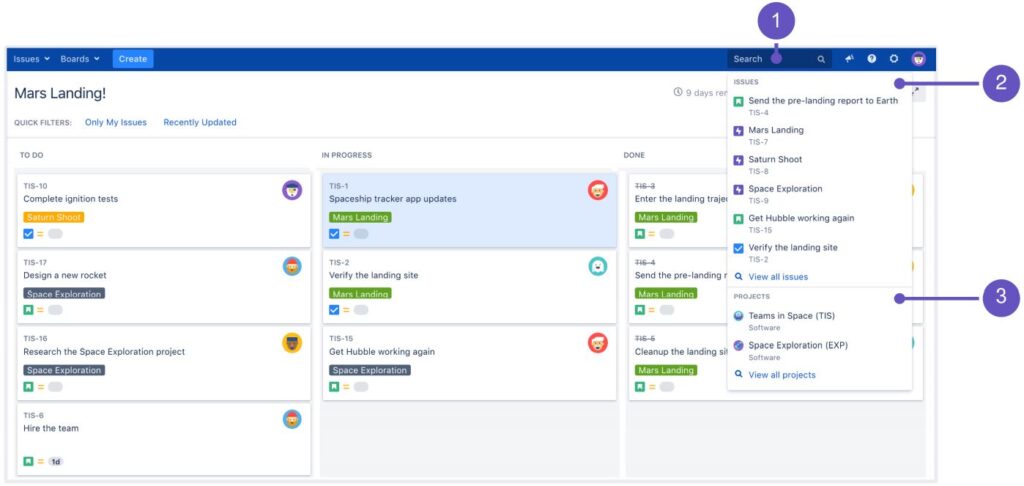
Search
This area allows you to directly type a quick search based on a key words (1). In addition, you can reach recent searched issues (2) and filter issues by Jira Projects (3).
Help
This one is obvious.
Cog
Here you can access administration of your Jira Project.
Your Jira account
In this last option, in addition to have the possibility to log off, you can customize your profile, for instance to add an avatar that will be displayed on your User Stories.
Jira Project left bar menu
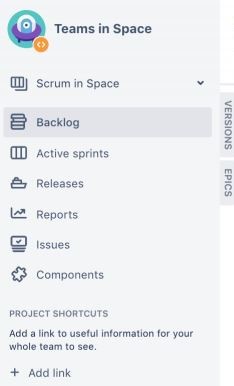
The first row makes it possible to select the board in your current active Jira Project. At the bottom, the cog sends you to the Jira Project administration. So, let’s review the other choices in this menu from top to bottom.
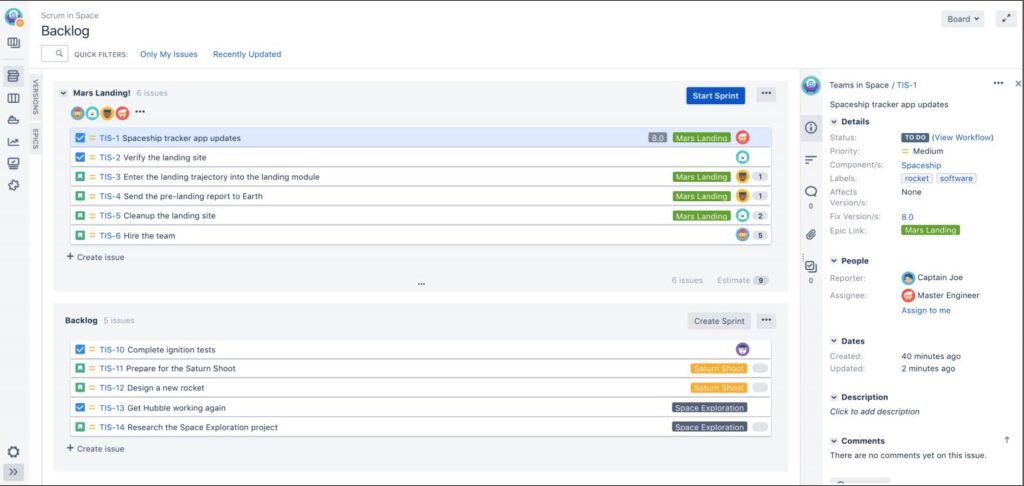
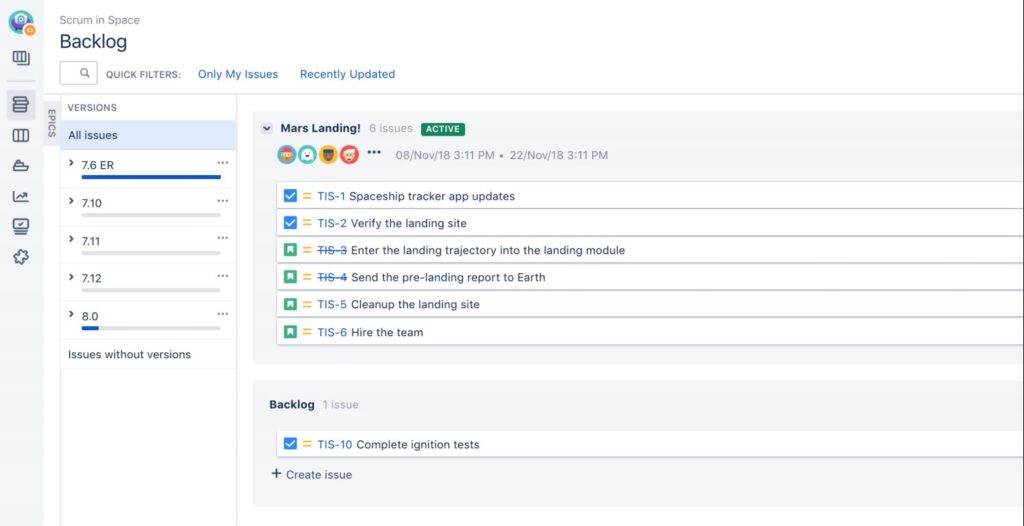
Backlog
This menu brings you to the screen to manage you backlog. To illustrate you can:
- Create issues.
- Create your sprints.
- Prioritize issues in you backlog.
- Allocate issues to your sprints.
Note that Jira proposes also a bulk change mode when you want to impact many issues at the same time with the same change.
If you click on the hyperlink of an issue, you will get the issue detailed screen below.
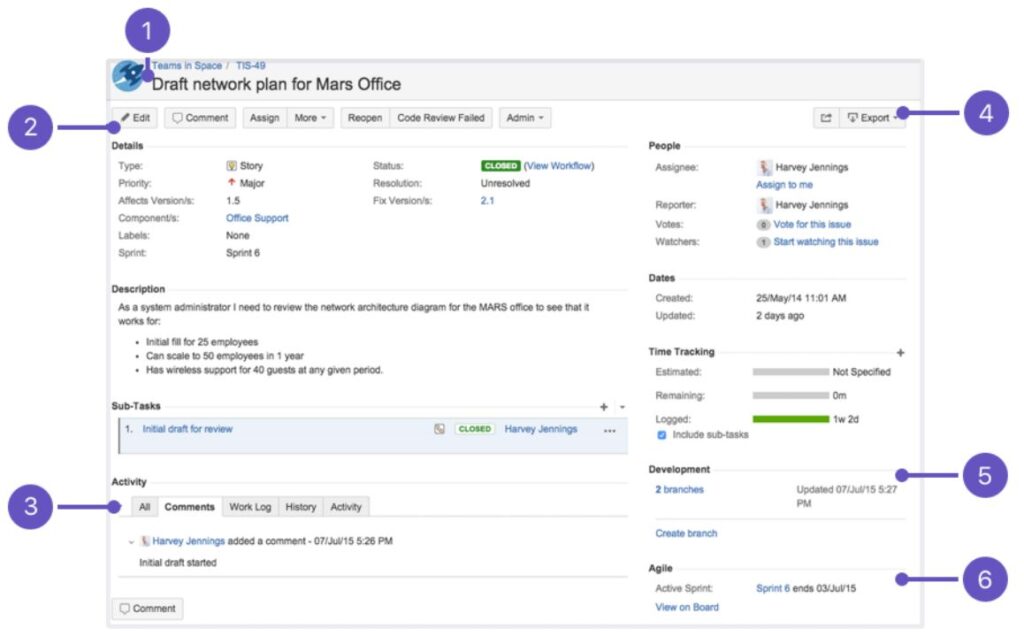
The options on this screen:
- The ID and title of the issue.
- The button to edit the issue.
- The tabs with comments, work log, history and activity.
- The button to export the issue for instance in CSV format.
- The development information. This requires Jira to be connected with a development tool.
- The reference of the sprint the issue belongs to.
Active sprint
This menu is to go to your digital board and manage visually your sprint. In other words, you can review the progress of your sprint, move User Stories and update them. Of course, like everywhere in Jira, you have access to “create” button, to create new issues.
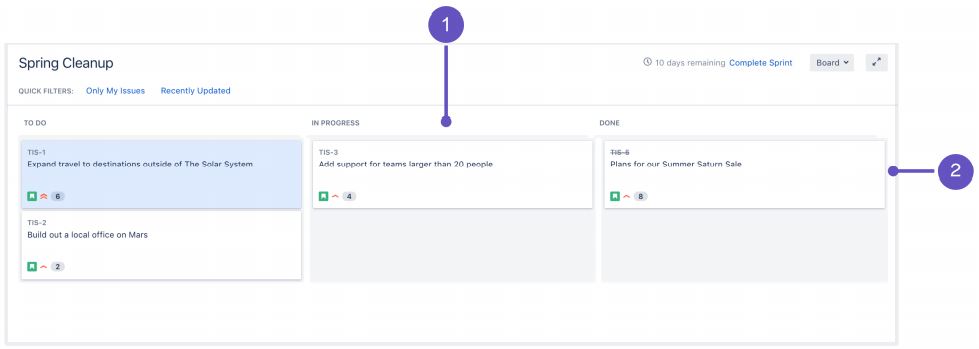
User Stories are displayed in:
- Columns: each User Story shows in the column where its status is mapped.
- Swimlanes: if you configure swimlanes (rows), your stories displays based on filters, for instance by class of service (emergencies then normal), or grouped by Epics.
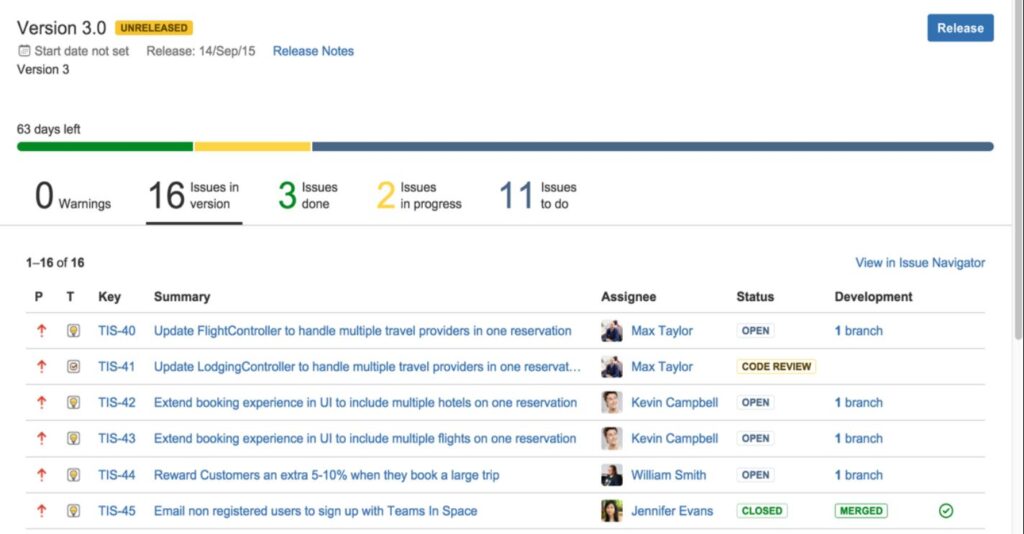
Releases
Let’s begin by stressing that Jira uses Release or Version with the same meaning. So, the “Releases” menu here sends to the the Release screen to monitor the progress of the selected version. To illustrate, you can see in this screen the progress of your User Stories or other issues gathered in 3 statuses: “Done”, “Work In Progress” and “To Do”.
Reports
With this menu, you access all Scrum and Kanban reports depending on the type of the Board. For instance the essential Burndown chart for Scrum.

Issues
This menu displays a list of issues based on current filter that you can change. In addition on the right, you have the detail of the active issue.
Components
With this menu you can create and update components of your Jira Project. Components may stand, depending on your choice, for technical components of your application or functional areas. To put it differently, it is a discretionary way in Jira to group issues.
Second column menu: management of Versions
Did you notice that displayed vertically you have 2 additional options on the right of the menu? The first one is Versions.
This menu allows you to:
- Create and update versions.
- Add and remove issues from versions.
Really, you first visit this menu to create your version and allocate User Stories to them before going to the Releases menu described above.
Second column menu: management of Epics
This second menu enables the creation of Epics as a parent grouping several User Stories. In addition, you can allocate User Stories to Epics.
Jira Project, Board and Sprint configuration
Jira Project configuration
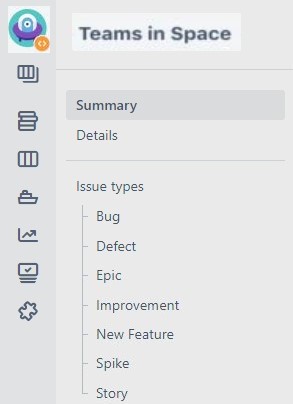
The first thing that you need to do when creating a Jira Board is to choose between Scrum or Kanban depending on the agile framework that you use.
Usually, you do not need to change the types of issue.
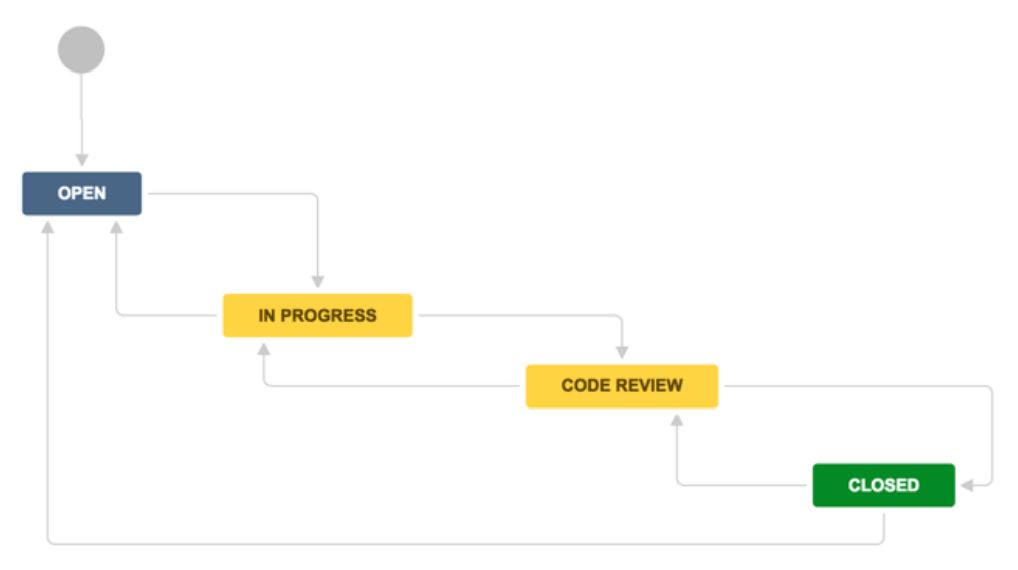
Workflow
A workflow is a set of statuses and transitions between these statuses that an issue goes through during its lifecycle. Each Jira Project comes with a default workflow and a simplified workflow. Contrary to the default workflow, in the simplified workflow there is no condition to move between statuses.
At last, you have the possibility to trigger actions when the status changes.
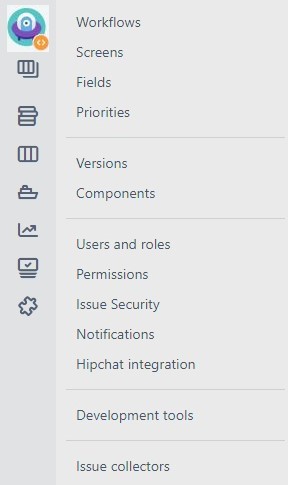
Screens and Fields
With these 2 menus you can:
- Specify screens to use for creation, update, view.
- Map fields to screens.
Priorities (of issues)
Here you can adjust the levels of priorities for issues. Usually there is no need to change at is is already quite rich.
Version and Components
These 2 menus make it possible to access the versions and components screens described above in the Board left bar menu.
Users and roles
This menu is to map users to roles for instance who is going to be team member or administrator of your Jira Project.
Permissions
Here you manage the permissions to grant to a role either:
- Project role, the standard roles in your Jira Project.
- Issue role, the standard roles across Jira Projects related to issues.
- Group role, the roles across Jira Projects.
Issue security
Jira proposes the option to manage specific confidentiality at issue level. Surely, this menu deals with this aspect. At last, this option needs to be activated for your Jira Project.
Notifications
To manage notifications like emails based on events on issues. For instance with change of status, like when an issue is done.
Integration with development tools
Jira can be integrated with development tools. And you manage it in this menu.
Jira Board configuration
To access the Board configuration use the Board menu on the top right of the Board (2). With menu “Agile Cards” (1), you can print the cards of your Board. So, we will review the options of this menu from top to bottom.
The first screen your reach is the General option in the Board Configuration.
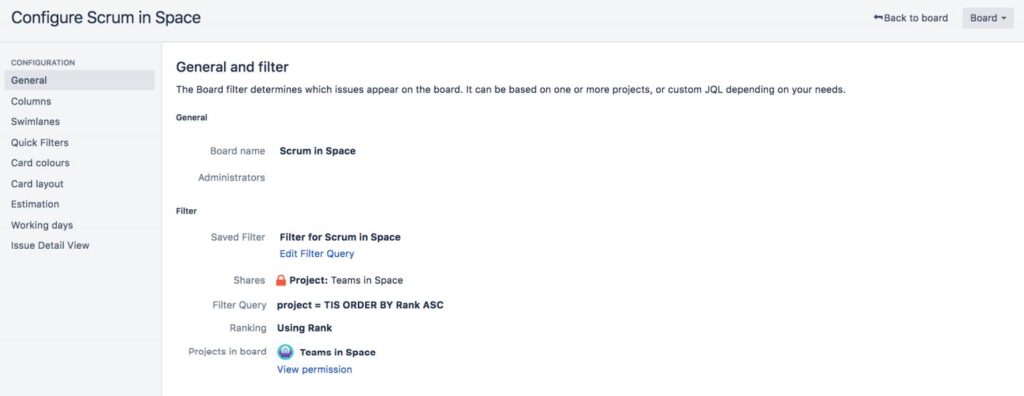
General for Board filter and ranking
In this menu, adjust the filter, aka the query to load issues in the Board and the order to display the issues.
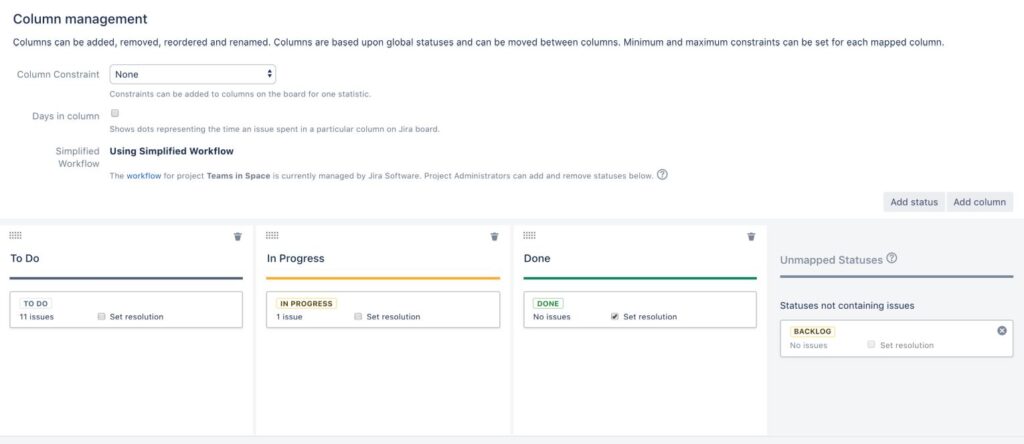
Columns
Here you can define and order your columns, the steps of your development process, and map the statuses of the issues to them. As a result, all issues with the statuses in a column will be displayed in the board in this column. Furthermore, issues with different statuses will not be displayed in the board.
Note that statuses are the same as in the active workflow. So all your statuses created or changed in this screen or in the workflow screen will be synchronized.
To map a status to a column just drag and drop. You also want to have the last status of your last column with “Set resolution” box checked. As a consequence, issues will turn to closed when then reach this status.
At last, you can also manage constraints for your columns with colors. For instance:
- Column turns red when the maximum number of issues is passed.
- Column turns yellow when the minimum number of issues is not met.
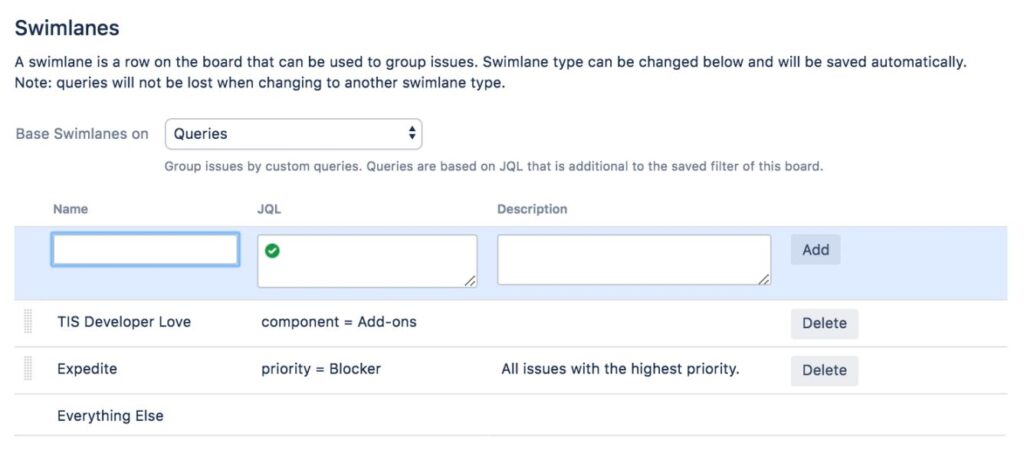
Swimlane
In this menu, you can define if needed, swimlanes that are special classes of service or a way to group issues. For example, a fast lane for emergencies to manage. To illustrate, this works with Jira Query Language (JQL). Still for the expedite swimlane to manage blockers, it would be:
- Priority = Blocker
- The last lane is the catch all swimlane and gathers all issues to be displayed in the board and that do not meet the conditions of the previous swimlanes.
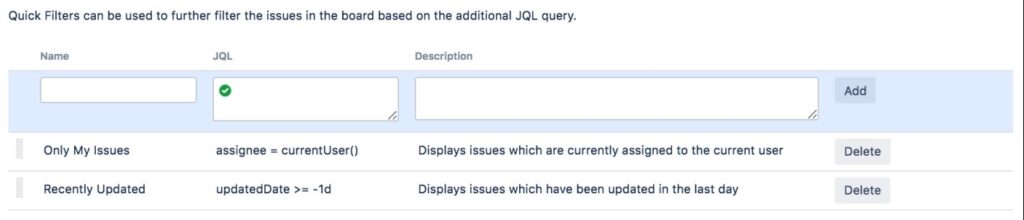
Quick Filters
This menu is where you integrate quick filters into the Board. For instance to keep only urgent or blocked issues.
Card colors
Jira proposes to change color of cards in the Board based on status. Truly, this actively supports visual management, for instance by coloring in red blocked issues.
Card layout
Here adjust the layout of your cards in the digital Board: choose the fields and how to display them in the cards.
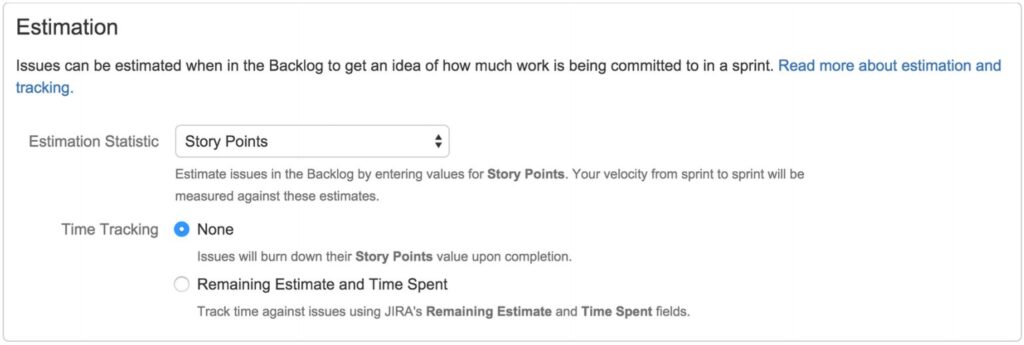
Estimation and tracking
Estimation and tracking vary in Jira based on your setting. Usually, estimations are in Story Points but the tracking is managed with time spent and remaining time. Really, this makes it possible to have a gradual measure of progress. If not, Jira captures the Story Points of the User Story only when it is done. As a result, Burndown looks like steps of a stair and you may even have all the achievements at the end of the sprint. In other words, a tunnel effect.
Working days and time zone
The purpose of this menu is straightforward.
Issue detail
This last menu is to customize the fields displayed in Issue Screen.
Jira Sprint configuration
Your last step before starting to use Jira for your Scrum team is to configure your sprint.
Really, configuring a Jira sprint is easy. You proceed in the Backlog screen in your Board to create your sprint and drag and drop User Stories in it.
Nevertheless, there are couple things to have in mind to close a sprint:
- Closing a sprint
- You cannot close a sprint if some tasks are not done. Therefore, you will have to check them for consistency.
- User Stories still open are transferred to the next sprint. Similarly here, you want to check for consistency.
- If some User Stories are partially delivered, it is a good practice to create a new User Story for completion. This way you keep record of the work actually delivered in your sprint and do not spoil your Burndown. This is important to have a relevant Velocity history.
- Reopening a sprint
- In some case, you may have to reopen a sprint to fix data errors for your tracking. In fact, you cannot have 2 sprints open and active at the same time, unless you turn on the parallel sprint option.
- You can access parallel sprint option in the Jira Project configuration.
What’s next? Learn more about Agile and the two main Agile frameworks: Scrum and Kanban
Learn more about Agile and its principles. In addition, review the two main frameworks in Agile: Scrum and Kanban. In addition, there are plenty of other materials around Agile and Agile at Scale. Here is my post to have an introduction to Agile at Scale.